OpenDS is Sun’s open source LDAP directory server. It’s lightweight, fast and – thankfully after Directory Server 5.2 in particular – it’s very easy to install and use.
Have a look through the initial announcement, download OpenDS 2.0 then grab the release notes and have a quick look through the documentation.
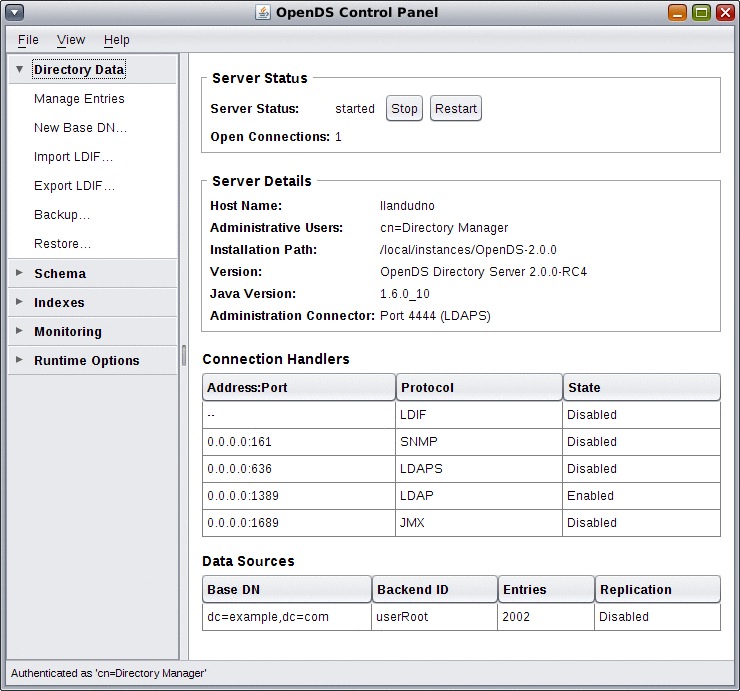
As always with OpenDS the install is very straightforward and painless. Once up and running the GUI makes a nice change from the slow, cluttered mess of the old Directory Server. I’d now rate OpenDS is a solid, mature offering, and I’ll be looking at replacing some of my aging DS 5.2 installs with it.
OpenDS qualifies for support from Sun, in it’s Sun OpenDS Standard Edition guise, so there’s no reason not to look at production deployments. For the more esoteric installs, you’ll still want Sun Directory Server (v.7 is being working on at the moment) but for a smaller or more straightforward install, OpenDS will fit the bill nicely.
It’s an annoying and recurring problem – your previously configured and well behaved Solaris machine has now dropped off the network, and no-one can log in. Going in via the console shows that all LDAP lookups fail, and that’s why no-one can log in.
/var/adm/messages is filled with cheery messages like this:
ldap_cachemgr[173]: [ID 293258 daemon.error] libsldap: Status: 0 \
 Mesg: Empty config file: '/var/ldap/ldap_client_file'
You’ll also find the LDAP client SMF service has gone into maintenance mode:
bash-3.00$ svcs ldap/client
STATE          STIME    FMRI
maintenance    17:17:42 svc:/network/ldap/client:default
So what happened? The Solaris ldap_cachemgr process regularly talks to your LDAP servers, and at a pre-defined interval (usually 12 hours) it refreshes the client config. This has a number of benefits, not least of which is that you can make one change in the LDAP directory, and the have your clients all update themselves automatically.
This is great for putting a new LDAP server into play, or for doing a server migration.
The problem arises when /var, where the two LDAP configuration files are stored, is full. Unfortunately ldap_cachemgr doesn’t bother to check that it can save the new config – so it tries to replace the two existing config files, fails, and ends up writing zero byte files in their place.
Luckily the fix is a simple one – simply copy ldap_client_cred and ldap_client_file from another working server into /var/ldap, and then restart the ldap_cachemgr.
bash-3.00$ svcadm clear ldap/client
bash-3.00$ svcs ldap/client
STATE          STIME    FMRI
online         17:17:42 svc:/network/ldap/client:default
The workaround is to make sure that the /var partition never fills up. If it’s 100% full it’s bad for a number of reasons, and you need to put processes in place to trigger alerts to stop this happening.
The bug in ldap_cachemgr is being tracked with SunSolve Bug ID 6495683 – “LDAP client files & cred files are deleted when /var is full”
The ldap_cachemgr can also be queried to find out who it’s bound to – and also when it will next be refreshing the LDAP client configuration. Pass it the -g option:
bash-3.00$ /usr/lib/ldap/ldap_cachemgr -g
cachemgr configuration:
server debug level          0
server log file "/var/ldap/cachemgr.log"
number of calls to ldapcachemgr         30
cachemgr cache data statistics:
Configuration refresh information:
  Previous refresh time: 2009/06/03 05:17:42
  Next refresh time:     2009/06/03 17:17:42
Server information:
  Previous refresh time: 2009/06/03 09:57:42
  Next refresh time:     2009/06/03 11:17:42
  server: 192.168.13.101, status: UP
Cache data information:
  Maximum cache entries:          256
  Number of cache entries:          0
I’ve been working on some Rough Guides – high level overviews to introduce a particular technology or tool. These are not particularly technical or indepth – instead, I want to introduce new technology topics and hopefully you’ll be interested enough to find out more (and start using them yourself).
This is the first in (what I hope will become) a series of them, and provides a high level introduction to LDAP.
Please have a read and let me know what you think in the comments section.
Edit: Quick update to the PDF, please re-download again to get the changes.
A Rough Guide to LDAP
In this post I’m going to quickly show how to use the tools ldapaddent and ldapmodify to change an existing LDAP entry. Specifically this relates to Sun’s stupidly named Java Enterprise Directory Server 5.2, which I’ve been doing a lot of work with recently. However the ldapmodify command that comes with Solaris basically does the same job regardless of which LDAP server you’re talking to.
If an entry already exists in the LDAP directory, then ldapaddent will fail when trying to add the data. So we need to use another method.
The basic steps are:
- use ldapaddent to dump out the existing entry (BACKUPS!)
- construct a temporary data file with our changes
- use ldapmodify to load this data into LDAP and modify the entry
- use ldaplist to see the changes
Let’s look at changing the RBAC profiles that a user has access to.
First we can use ldaplist to check out their details:
bash-3.00$ ldaplist -l passwd tomk
dn: uid=tomk,ou=people,dc=siliconbunny,dc=org
SolarisAttrKeyValue: type=normal;profiles=JET
SolarisUserQualifier:
cn: tomk
uidNumber: 1001
gidNumber: 14
gecos: Tom Kranz
homeDirectory: /home/tomk
loginShell: /bin/ksh
objectClass: posixAccount
objectClass: shadowAccount
objectClass: account
objectClass: top
objectClass: SolarisUserAttr
uid: tomk
shadowLastChange: 13122
shadowFlag: 0
We can see they have the JET profile – let’s add the System Administrator profile too.
We can redirect the output from ldaplist direct to a text file for direct use as a backup, as this is already in LDIF format:
bash-3.00$ ldaplist -l passwd tomk > /var/tmp/tomk.ldif
If we really got things wrong we could just delete the entry from the directory, and then use ldapddent to add our backed-up entry and get back to where we started.
Now we need to create a change file, which will contain the data we want to modify. Again, this file will be a text file with the LDIF syntax, and it will have some specific keywords that define the type of change and the data that should be modified.
In this instance, we want to add another profile, so we create a file called tomk.ldif with the following contents:
dn: uid=tomk,ou=people,dc=siliconbunny,dc=org
changetype: modify
replace: SolarisAttrKeyValue
SolarisAttrKeyValue: type=normal;profiles=JET,System Administrator
The format of the file is straightforward. The first line contains the file context of the object to be modified. The second line shows the action to be taken on the object. The third line shows the specific action to be taken for an entry, and the fourth line has the new data.
Note that, within this file, we could modify several entries at once – we would just need multiple ‘replace’ and attribute lines to detail the data.
Once we have this file we can call ldapmodify to load this data into the LDAP directory, modifying the user’s details:
bash-3.00$ ldapmodify -D “cn=Directory Manager” -r -f /tmp/tomk.ldif
ldapmodify will prompt us for the Directory Manager’s password, and then carry out the changes.
We can check this by called ldaplist again and examining the output:
bash-3.00$ ldaplist -l passwd tomk
dn: uid=tomk,ou=people,dc=siliconbunny,dc=org
SolarisAttrKeyValue: type=normal;profiles=JET,System Administrator
SolarisUserQualifier:
cn: tomk
uidNumber: 1001
gidNumber: 14
gecos: Tom Kranz
homeDirectory: /home/tomk
loginShell: /bin/ksh
objectClass: posixAccount
objectClass: shadowAccount
objectClass: account
objectClass: top
objectClass: SolarisUserAttr
uid: tomk
shadowLastChange: 13122
shadowFlag: 0
ldapmodify will also allow us to edit multiple entries at once. For example, let’s look at not only adding the System Administrator RBAC role, but also adding a title for use with an internal phone book app.
We’d build our file like this:
dn: uid=tomk,ou=people,dc=siliconbunny,dc=org
changetype: modify
replace: SolarisAttrKeyValue
SolarisAttrKeyValue: type=normal;profiles=JET,System Administrator
–
add: title
title: UNIX dude
By using the fairly simple LDIF syntax in plain text files, it becomes very quick and easy to use ldapmodify from the command line to change LDAP entries in the Directory Server.